Technique - Bebob V90RM V-mount battery: digging into the BQ20Z65
This is a preliminary article. When I have written down the info a bit more comprehensive, I'll update it.
Word upfront
This is an article with a high 'Please don't try this yourself' factor. The amount of energy you are dealing with is huge and you just can't afford a 'mistake'. If what you see makes questions arise: DON'T EVEN THINK ABOUT DOING THIS!
The problem: dead lithium-batteries
 When I bought a 'new second-hand' videocamera in 2017, I also got not less than 6 V-mount batteries with it, batteries the size of a small brick as they are commonly used in the video-industry.
Because the camera works for about 3 hours on 1 battery and the charger can charge them in about 4 hours, I usually managed with 3 batteries. Two for that matter, spent all their time lying around, even in their original package.
Until I wanted to use them in 2018 for the first time. When I placed them on the charger, it resonded the way I expected: it didn't do anything, except for shortly changing the charging-indicator from green to red, which then turned green again. When I pressed the check-button on the battery to see the remaining state-of-charge, nothing happened at all anymore.
Ah well, with 3 batteries left, this wasn't such a disaster. But eventually, one by one those also got to the same end and by Februari 2021 I did not have a single working battery left. One had already been disposed of properly, a pity, in hindsight.
So there I was, with 5 batteries that basically had become nothing but expensive presse-papier.
But, quickly after the first defective battery, I got curious: Why did the charge-indicator lit up shortly on insertion of an undercharged battery? It really appeared like software was telling the charger to quit charging... Let's open it up!
The inside
Removing all the screw to open this thing up was a tough experience. These batteries are well built, with a reason of course. The D-tap connection at the top of the battery adds in the difficulty level, as it almost has to be de-soldered to be removed from the housing.
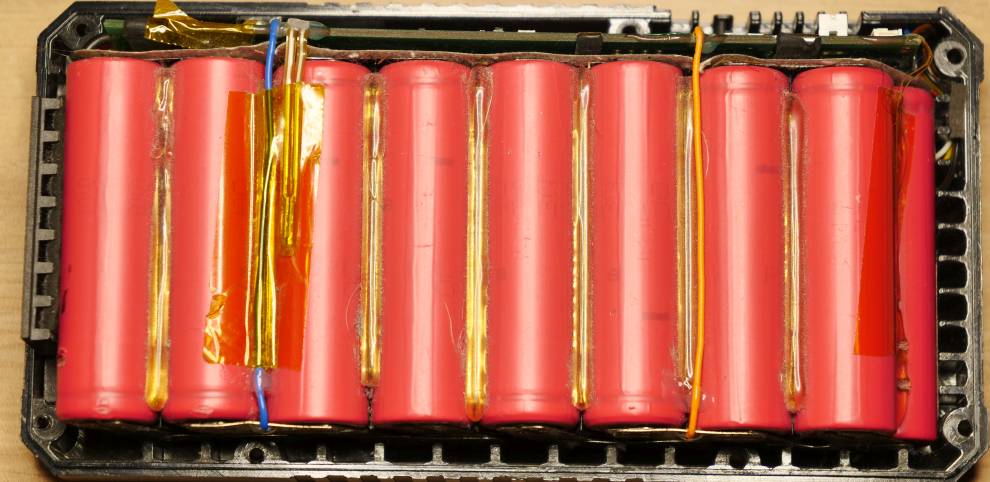
But, once desoldered, I got have a good look inside. A sturdy construction with all cells glued together, while thick metal strips, spotwelded to the individual cells, made for a strong mechanical connection. Two thermistors are keeping an eye on the temperature of the cells (the second thermistor is hidden under the cells at the right.
In this picture, the extra layer of isolation on top of the metal-strips connecting all the cells together, has already been removed.
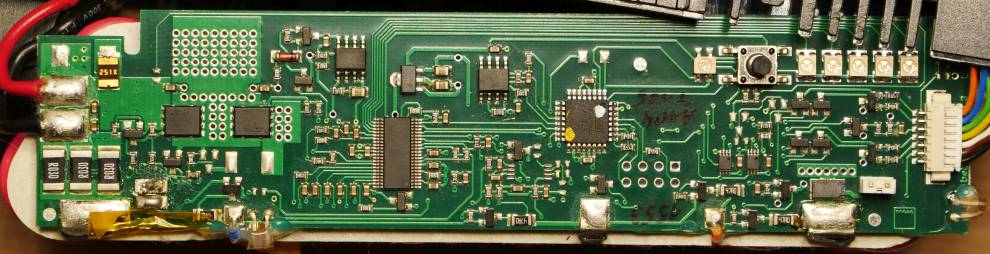
When I got to take a look on the PCB, I was startled for a while. What a huge number of components! But, not to fear, one can probably find evertything.
Every part still had its marking, so with the internet at hand, I would probably find out a lot. What you see beneath is the effort of a lot of nights wandering around the web to find out what every part does, as not every part was easily found by the marking on it alone. Only searches like 'partnumber + smart battery' got results most of the time.

In the picture above, I marked all the important components, but really only the BQ20Z65 needs your attention.
This is the insanely complex Battery Management System integrated circuit, that rigidly monitors every individual cell with great accuracy. Too great of an imbalance between cells, overvoltage, overcharge, undercharge and undervoltage are all monitored and will make the circuit disconnect the cells or starts balancing them.
Important function of this IC is the protection mode. When the cells get depleted to far, it enters a protective mode for a defined time. Discharging them even further is prohibited by the circuit and you have to start charging the cells in that time again, to avoid the circuit going into CUV-mode: Critical UnderVolt mode. This also sets a 'flag' in the on-board flash memory of the chip, basically telling to shut up shop: the PF-flag or PermanentFailure flag. The cells are then disconnected from the outside world and can not be charged or discharged ever again.
The downside is that this status can't be cleared without talking to the circuit on deep-level memory. Just removing the cells and replacing them with new ones won't do the trick as the BMS-chip doesn't know any better than that its last state was 'completely dead'.
Another trick up the BQ20Z65's sleeve
 As a final resort, the BMS-chip has another safety-feature at hand, something I only discovered February 26, 2021.
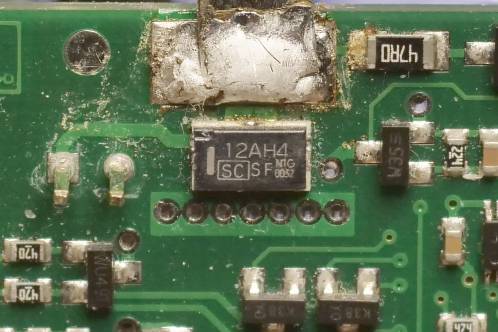
And that is all about the SFH-1412 fuse almost completely right-bottom on the PCB.
This is a so called 'Logic fuse', also mentioned as a Self Control Protector.
But, every fuse has a logical function right!? It melts when too much current flows!
This fuse however, has an extra feature, as the name implies: It can act on external command. Underneath the fuse-link is a heater which melts the fuse-link on top. This heater can be controlled by a small signal coming from digital electronics.
As soon as the BMS-IC has set its Permanent Failure, the SAFE-pin is driven high, which then melts the fuse. That explains the short-lit charge indicator, which differed in time from battery to battery.
This makes resetting the IC and placing new cells still useless, as this fuse will prevent current from flowing in- or out the battery, while the IC keeps saying everything is OK.